This is a delicious and easy meal that cooks up in one pan.
Ingredients:
7 or 8 center cut pork chops, bone-in
1 can of diced tomatoes
2 onions, sliced thin
1 green pepper, diced
1 cup beef broth
1 tsp. dried thyme
2 cloves garlic, chopped fine
4 Tablespoons of good quality olive oil
2 Tablespoons balsamic vinegar
Salt and pepper to taste
Salt and pepper the chops.
In a large skillet that has a cover, add 2 Tbs of olive oil and lightly brown the pork chops in two batches. Remove from pan and set aside.
Add remaining olive oil and over medium heat, saute the onions, peppers, garlic and thyme until the onions are translucent. Add the tomatoes, vinegar, beef broth, salt and pepper and the pork chops. Bring to a boil, cover and reduce heat to a simmer. This should simmer for at least 1 1/2 hours or until the chops are tender. You can certainly do this in the oven at 350 degrees... or try it in a pressure cooker for about 35 minutes with a slow release of pressure.
Delicious served with mashed potatoes, rice or noodles. I served it with broccoli rabe sauted in garlic and olive oil.
Sunday, January 21, 2007
Tuesday, December 12, 2006
Chocolate pecan cookies
This is an original recipe! Give it a try and tell me your results!
Ingredients:
1/2 cup semi sweet chocolate morsels
1 stick plus 1 T butter, room temp, divided.
3/4 cup brown sugar
1/4 cup white sugar
1 egg
2 T light corn syrup
1 t vanilla extract
3 T cocoa powder
1 cup flour
1/2 t baking soda
pinch of salt
3/4 pecans, chopped fine
Preheat oven to 375.
In a glass bowl, combine 1 T of the butter with the semisweet chocolate chips. Microwave on full power for 30 seconds. Stir and do it again until the chocolate and butter melt together. Stir until smooth.
Meanwhile, in the bowl of an upright mixer, combine the sugars and remaining butter and mix with a paddle attachment until light and fluffy. Add the egg, vanilla and corn syrup. Mix. Add the melted chocolate mixture and combine thoroughly. In a small bowl, whisk the flour, baking soda, salt and cocoa powder together and add to the mixer in 2 batches to combine thoroughly. Finally, stir in the chopped pecans.
Using 2 teaspoons, or a small (1T) scoop, make 1" balls of dough and drop onto an ungreased baking stone or cookie sheet.
Bake for about 12-15 minutes until the top begins to crack and the cookies have formed a crust. Don't overbake.
Allow to cool for 5 minutes before removing from the stone and cooling on a rack.
Makes about 3 dozen cookies.
I would have taken a picture, but they got eaten too fast!
Monday, November 20, 2006
Lamb fore
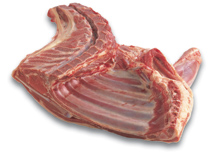
Brace yourselves! We had dinner at my mom's last night and she made a unique cut of lamb called the 'fore'.
Basically you are getting the front breast quarter, the front shank and a few ribs. (the image above includes the neck. Ours didn't.) It is a big hunk of meat that the butcher usually cuts into forequarter chops and other parts. Mom went in to the grocery store the other day and discovered that chops were on sale for $1.99 a lb, so she asked the butcher if she could buy a whole fore at that price. He brought a kryovac bag out of the back and labeled it for her. Total cost: around $14 bucks.
The fore is a fairly fatty cut, so first thing you do is cut off all visible fat. Then, she rubbed it all over with salt, pepper, garlic and oregano and put it into a 375 degree oven for about 45 minutes to cook off some of the fat. She drained out all the fat and at that point added to the roasting pan:
1 28 oz. can diced tomatoes, with juice
1 28 oz. can crushed tomatoes, with juice
1 14 oz. can of chicken broth
2 green peppers, diced
1 red pepper, diced
1 large onion, diced
1 cup dry red wine
2 bay leaves
1 tsp dried oregano
2 to 5 cloves minced garlic
zest and juice from 1 lemon
salt and pepper to taste
You can add other veggies if you like. Try diced eggplant or zucchini or green beans, for example.
Cover the whole thing with foil, lower the temperature to 325 degrees and cook until the meat is falling off the bone. (About another 2 1/2 hours.) Check after 1 hour and add more liquid if necessary.
Remove as much fat as possible from the vegetables. The lamb just pulls apart at this point, so remove chunks and serve over pilaf with the veggies and a salad. It is a very rich meal, so follow with some fruit and tea for dessert.
This recipe also works for lamb shanks.
The result? My youngest son announced that it was the best dinner he had ever eaten. I brazenly went back for seconds, immediately regretted it and had to go lie down on the sofa. It was spectacular, with succulent meat and incredibly rich tasting vegetables. A sure hit.
Wednesday, November 15, 2006
Eggplant Parmesan- from the Urban Mermaid
Here's another great recipe from The Urban Mermaid. Thanks Emily!
EGGPLANT PARMESAN
Slice two large eggplants paper thin. Salt both sides (I like Kosher salt) and let drain in colander.
Forget about them for an hour. Come back and rinse the salt and then stack up the slices between two plates weighed down with a few cast iron pans. Let drain for an hour or more.
You can then refrigerate the whole deal in a plastic container and make it another day if you wish.
When you are ready scramble five eggs and pour into a glass pie plate. Dip three or four eggplant slices at a time in the egg to coat both sides. Then fry in a 1/4 cup of hot olive oil 375 degrees, in a large frying pan. The slices cook in seconds, turning golden on each side. When cooked lay them on paper towels or paper bag to drain the oil. You may want to use long handle tongs to avoid occasional oil splatter. When done and slices are drained, place slices in oven proof dish over a layer of tomato sauce. Then alternately layer the eggplant slices and the tomato sauce thinly and bake at 375 for ten minutes. I used two and a half jars of Job lot tomato sauce to cover the eggplants. (Job Lot is a local discount store with gourmet foods on sale. Try Trader Joes if you have one, or make homemade sauce!)
Sprinkle with fresh grated parmesan.
Enjoy with salad.
Thursday, November 09, 2006
Guest Blogger: The Urban Mermaid!
Ok, all you granola fans, here is a great recipe that you can make yourself. I'd probably have to scale it down a bit, but maybe not!!!
Thanks to The Urban Mermaid for this fantastic recipe. Oh, and there is a bonus at the end, LOL.
Thanks to The Urban Mermaid for this fantastic recipe. Oh, and there is a bonus at the end, LOL.
The Urban Mermaid Granola
It's so easy to make.
We buy 50 pound bags of thick cut oats and store them in our cold cellar in gigantic tins.
1 cup corn oil
1 cup regular Barbados molasses
sprinkle of Kosher salt
1 Tablespoon of Job Lot's real vanilla
4 or five empty (quart) yogurt containers filled with oats
Heat oil, molasses, salt, and vanilla, in a large pot. While stirring add oats. Mix thoroughly, then spread over two Pampered chef stoneware baking trays and bake at 300 degrees Fahrenheit. Scrunch the oats to fill the corners of the pan and they won't burn! Stir oats from edges of baking pan every 20 minutes. The oats are done when they are golden brown. (three or four 20 minute sessions) Let cool and then put in sealed container. We use thick cut oats.
Carry a bag of this granola with raisins, with you and you'll never starve!
Enjoy!!
Mermaid's Fast Baked Beans
Take some leftover home cooked pinto beans and add some Musselman's apple butter and heat, it's like Boston baked beans in a pinch.
Tuesday, November 07, 2006
Tools I couldn't live without
Because I sell kitchen tools, people ask me all the time which ones are my favorites. To be honest, there are very few in our line I don't love... but there are a bunch that I use constantly:
All of these are by The Pampered Chef. The best kitchen tools on the market if you ask me.
9x13" Stoneware baking pan. I use this thing at least a couple of times a week. I'll throw a bunch of chicken thighs with herbs and garlic on them to bake. I made ziti in it last week. I make my baked ravioli in it. I can do brownies or sheet cakes one day and baked pork roast the next. It is my constant companion in the kitchen and the perfect size for a family of 4. (Bread pudding in it is to die for, too. I made the French bread with bourbon sauce from the Joy of Cooking and people were blown away.)
Deep dish pie plate. Ok, I admit, I think the fluting around the top is sort of dorky, but I really really love the way the pies come out in this thing. Mine is just now starting to develop the right patina and it bakes the crusts beautifully. No more soggy bottoms. Now that I have discovered the roll out ready-made pie crusts, I make pies for dinner all the time. It is a very quick way to use up left-overs and the kids love them.
8" Executive saute pan. What's not to love? It is non-stick, but it has a lifetime warranty. It has a silicone handle so I don't have to use a pot holder on the stove. It has a flared rim so I can pour stuff out of it without dripping. And it fries up an egg perfectly. Every time. I love my cast iron pans, don't get me wrong, but when I am frying my eggs in the morning, I use my little saute pan and love it.
Chef's tongs. These are great because the ends have silicone covers, so they won't mar my non-stick cookware. Plus they are self locking so you can put them in your tool canister without them flopping open and tangling up the rest of your stuff. Love them.
Garlic press. Don't have to peel the cloves. Actually can fit a whole clove in the hopper. Great contoured handle. Hasn't broken yet, which is more than my last two presses can say.
Pizza stone. I use the 15" for cookies and lots of pizzas. I am a fan of Callise Bakery crust in a bag, but even frozen pizza tastes better when the crust isn't a soggy mess.
12" Family Skillet. PC has two versions of this, but I like the Executive. Goes from the stovetop to the oven up to 400 degrees. I make a quick chicken parmesan in mine that is delicious. Plus you can bake a pretty impressive pineapple upside down cake in it, too!
Those are my favorite Pampered Chef tools. For non-PC tools I like:
Oxo salad spinner. Since we make salad every stinkin' night, plus have a hungry bunny to feed, we better have a handy way to wash all that romaine. We are on our third OXO spinner and will be buying another one when this one breaks.
12" Cast iron frying pan. Oh how I love thee, let me count the ways. I love that you weigh 20 lbs. (Actually, the only thing I don't love...) I love that you are now non-stick after I have carefully tended to your beautiful seasoning over all these years. I love that my kids kids will be able to fry chicken or make a whopping huge cornbread or stir fry their veggies in you. I love that you cost me about $15. New.
Pyrex measuring cups. I wish they nested, yes, but I like the heft of these cups. They just seem indestructible and that is a good thing when I am measuring out all those potentially dangerous ingredients, LOL.
Kitchenaid stand mixer. I don't bake tons, but when I do, it is AMAZING to have the right tool for the job. See earlier posts about my mixer obsession. But for day to day work, the KA is the one for me.
All these tools make getting dinner on the table easier. And since I do that 5 or 6 nights a week, it is great to have good stuff in the kitchen!
Monday, November 06, 2006
Chicken pot pie
Ok all you busy folks, here's something I have been doing lately to make life easier.
Step one: Roast a pair of chickens. Save the juices to make gravy. Eat 1 roasted chicken for dinner and throw the second one in the fridge. Save the carcass from the first one.
Step two: Make chicken pot pie out of the leftovers (see recipe below).
Step three: Make chicken soup out of the carcasses.
So here is my super simple chicken pot pie recipe:
2 pie crusts (homemade or store bought dough)
shredded leftover chicken. (3 cups or so)
1/2 a bag of frozen veggies
Gravy (homemade or canned)
Salt and Pepper
This isn't rocket science. I put the bottom crust into the pie plate. Fill it with the chicken and veggies. Pour over the gravy until the filling is nice and moist. (about 2 cups of gravy) Salt and pepper it and put on the top crust. Crimp the edges, vent the top and bake at 350 for about 40 minutes or until the crust is golden brown. Since the chicken is already cooked, you only want to worry about your crust.
Last night I made one of these before going to a meeting and by the time I came home, my husband and two boys had eaten the entire thing. I ended up having to get takeout, if you can believe it.
Subscribe to:
Posts (Atom)
